Google Workspace Training / User / Calendar
Collaborate in Calendar
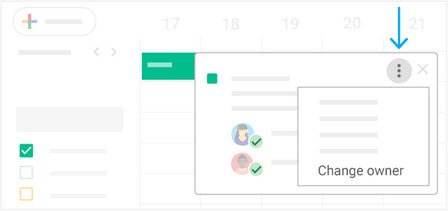
Change an event owner
You can change the owner of an event you created. The new owner won’t receive any notification, but their name will appear as the event owner on all the guests’ calendars.
- Single-click the event and at the top, click More
 > Change owner.
 - Enter the email address of the new owner.
- (Optional) To add a note for the new owner, enter a message.
- Click Change Owner.
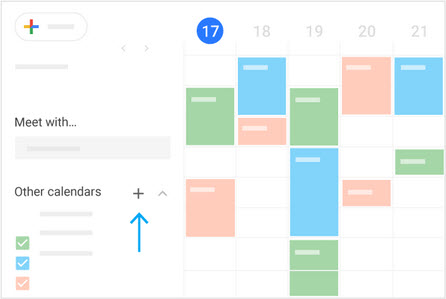
Add a co-worker’s calendar
Add a co-worker’s calendar to see all your events on the same page.
Note: Your co-worker must have an email address on your organization’s Google Workspace account.
-
On the left, next to Other calendars, click Add other calendars + > Subscribe to calendar.
-
Start entering the person’s name or email address and select the person from the list.
If the person set up their calendar for sharing, it appears in your list of calendars. That person’s events also appear on your calendar.
-
If the person doesn’t have Google Calendar, add a request and click Send invite.
-
Quickly schedule events by checking your co-workers’ availability:
- To view a co-worker’s calendar next to yours, check the box next to their name.
- To view several co-workers calendars at once, check the boxes next to their names, or go to Meet with… and enter their names. At the top right in the view switcher box, click Day. The calendars appear next to each other so you can easily see when everyone is free at the same time.
-
(Optional) To view only your calendar, point to your calendar name and click More
> Display this only.
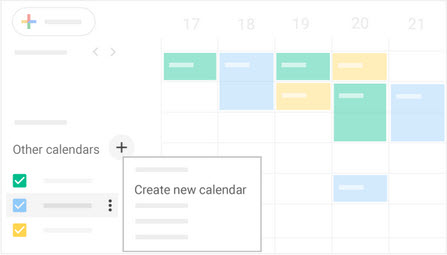
Create shared calendars
You can create new calendars for teams and projects.
- Open Calendar, and on the left next to Other calendars, click Add other calendars + > Create new calendar.
- Name the calendar and add a description.
- Click Time zone and select your time zone.
- Click Create calendar. Your new calendar appears under My calendars.
- (Optional) To update any calendar preferences, point to it and click More > Settings.
Share or delegate your calendar
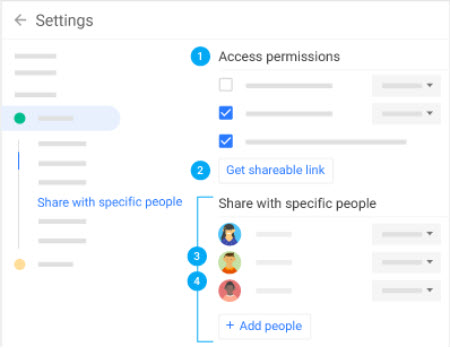
1 – Choose whether to share your calendar publicly or only with your organization:
- Click Settings
 > Settings.
 - On the left, click your calendar.In the Access permissions section, choose an option:
- To make your calendar available publicly on the web, check the Make available to public box. Next to each sharing permission, click the Down arrow Down arrow and choose whether you want to show your free and busy times.
- To make your calendar available only to your organization, check the Make available for My Organization box. Next to each sharing permission, click the Down arrow and choose whether you want to show your free and busy times.
- To make your calendar available throughout Google Workspace, check the Show calendar info in other Google apps, limited by access permissions box.
2 – Let someone see your calendar in a web browser:
You can get an HTML link to your calendar that you can share with people.
- Click Settings > Settings.
- On the left, click your calendar.
- In the Access permissions section, click Get shareable link > Copy Link.
- Paste the link in an email and send it.
3 – Share your calendar with specific people and choose how much they can see:
When you share your calendar with someone, you can decide how they see your events and whether they can also make changes, such as adding or editing events.
- Click Settings > Settings.
- On the left, click your calendar.
- In the Share with specific people section, click Add people and enter the email address or names of the people you want to share your calendar with.
- Choose a sharing permission option:
- See only free/busy (hide details)
- See all event details
- Make changes to events
- Make changes and manage sharing
- Click Send.
4 – Share your calendar with people who don’t use Google Calendar:
- In the Share with specific people section, click Add people.
- Enter the email address or names of the people you want to share your calendar with.
- Click Send.
- If the person you’re sharing your calendar with doesn’t use Calendar, click Invite to send them an invitation to use it.
Create a mailing group for events
You can use Google Groups to invite several people to an event at the same time.
Create a mailing group:
-
Sign in to Google Groups.
-
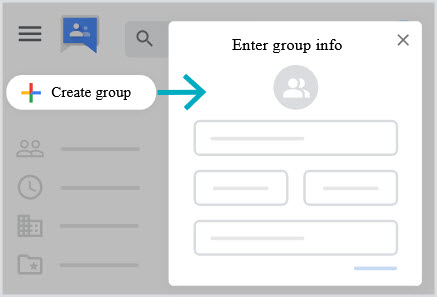
In the upper-left corner, click Create group.
-
Enter information and choose settings for the group.
-
In the Group members field, enter the members’ email addresses.
-
Click Create group.
Get help creating your group.
Invite the group to an event
- In Calendar, create an event.
- Add the group email address as the guest. Everyone in the group receives an individual invitation.